For hotel, serviced apartment, and multifamily operators, how do you replace a bathroom vanity is more than a DIY question. Every replacement affects guest satisfaction, downtime, and long-term maintenance costs.
Unlike a single-family home, a hotel or apartment project often involves dozens or hundreds of identical bathrooms. You need a repeatable process. Establish clear safety protocols. Have a reliable bathroom cabinet vanity manufacturer or wholesale bathroom vanity supplier supporting you.

This guide walks you through:
- When you really need to replace a vanity
- Tools, safety and preparation
- Step-by-step removal and installation
- Special tips for hotels and multi-unit apartments
- How to choose and standardize replacement units with OEM/ODM support
We will also touch on related topics throughout the article. These include double vanity sinks for bathrooms and corner vanities for bathrooms. We will also explore bathroom vanity with tall cabinet options and custom built bathroom vanity choices for project buyers.
Table of Contents
- When Do You Need to Replace a Bathroom Vanity?
- Tools and Preparation Checklist
- Step-by-Step: Removing the Old Vanity
- Step-by-Step: Installing the New Bathroom Cabinet Vanity
- Special Tips for Hotels and Multi-Unit Apartments
- Common Mistakes to Avoid
- How to Choose Replacement Vanities for Large Projects
- Why Work with a Professional Bathroom Cabinet Vanity Manufacturer
- FAQ: How Do You Replace a Bathroom Vanity?
- Recommended External Resources
- About Us – Your OEM/ODM Bathroom Vanity Partner
1. When Do You Need to Replace a Bathroom Vanity?
Before you ask how do you replace a bathroom vanity, you should confirm why it needs to be replaced. In hotel and apartment projects, common triggers include:
- Water damage and swelling
- Vanities built from non-moisture-resistant boards often swell at the base or around the sink cut-out. This leads to misaligned doors, mold risk, and guest complaints.
- Visible wear and brand inconsistency
- Scratched fronts, peeling laminate, and outdated colors pull the bathroom below your brand standard. A refresh is often part of a bigger renovation or soft refurbishment program.
- Layout or plumbing changes
- You may be upgrading to double vanity sinks for bathrooms in suites, or shifting plumbing to improve accessibility and circulation.
- Sustainability and water efficiency upgrades
- Many operators upgrade fixtures to WaterSense-labeled faucets and fittings to save water and support LEED or similar certification goals.
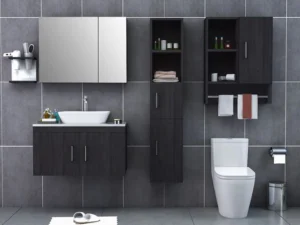
In small guest bathrooms, some owners also take the chance to shift from bulky floor-standing units. They opt for bathroom vanities for small bathrooms with floating designs. Others choose corner vanities for bathrooms to open up space.
2. Tools and Preparation Checklist
Even when you hire contractors, understanding the standard tool list helps you evaluate whether the team is properly prepared.
2.1 Tools
- Adjustable wrench and basin wrench
- Screwdrivers (Phillips and flat-head)
- Utility knife and scraper
- Pry bar (small, for gentle removal)
- Cordless drill/driver and bits
- Level and measuring tape
- Bucket and rags/sponges
- Caulking gun and sealant
For multi-room projects, many contractors also use:
- Dust sheets and floor protection rolls
- Shop vacuum for quick cleanup
- Laser level for consistent installation across rooms
2.2 Safety and PPE
Contractors should always use appropriate personal protective equipment (PPE):
- Safety glasses or goggles
- Gloves suited for sharp edges and chemicals
- Respiratory protection if cutting, sanding, or working with adhesives in confined spaces
OSHA emphasizes proper selection and use of PPE for construction and renovation work. This helps manage hazards like sharp edges. It also addresses dust, electrical risk, and chemicals.
For hotel and apartment operators, it is good practice to require compliance from outside contractors. They must adhere to current OSHA PPE standards. They should also follow site safety rules.
2.3 Site Preparation
Before removing any vanity:
- Block the room in the PMS (for hotels) or notify tenants in advance (for apartments).
- Confirm water shut-off locations (local valves under the sink or main riser).
- Protect floors and adjacent finishes.
- Remove mirrors or glass shelves at risk of damage during demolition.
In projects with many identical rooms, create a standard preparation checklist so every team follows the same steps.
3. Step-by-Step: Removing the Old Vanity
Now to the practical part of how do you replace a bathroom vanity – safe, clean removal.
3.1 Shut Off Water and Power
- Close the hot and cold shut-off valves under the sink.
- Open the faucet to relieve pressure and confirm water is off.
- If there are electrical outlets or lighting within the vanity, make sure the power is off at the breaker. This is essential before working near wiring.
3.2 Disconnect Plumbing
- Place a bucket under the P-trap.
- Loosen the nuts on the supply lines and drain trap with a wrench.
- Carefully remove the trap and drain components, keeping small parts together.
For multi-room projects, some operators replace old shut-off valves and flexible hoses at the same time, to reduce future failures.
3.3 Cut Caulk and Sealant Lines
Use a utility knife to cut through caulk:
- Along the back edge where the vanity top meets the wall
- Along side splashes or end panels touching tiles
- At the base if the vanity is sealed to the floor
A careful cut reduces wall damage and speeds up patching.
3.4 Detach the Vanity Top
Many tops are:
- Screwed from below, or
- Simply glued and caulked in place
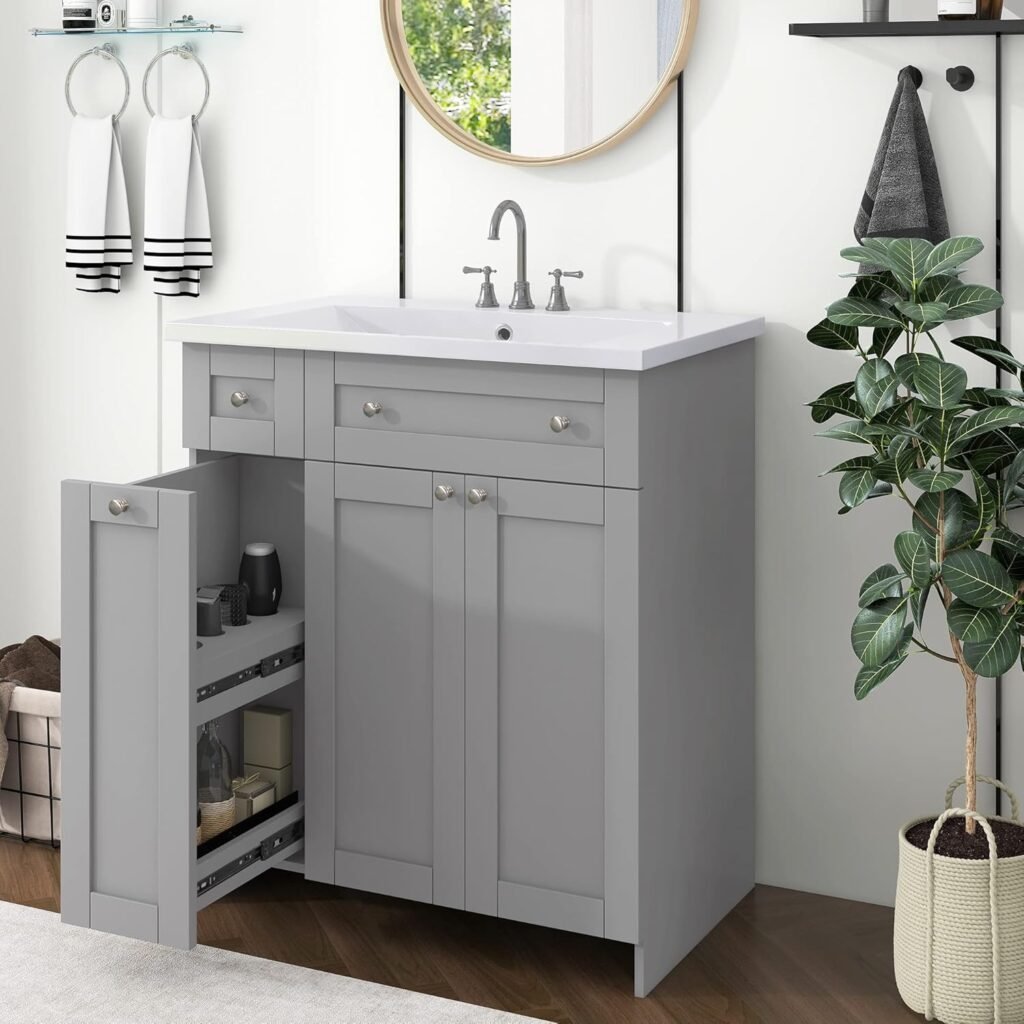
Remove any screws. Gently pry up the top. If it is heavy, use two people to lift it away. This is especially important for stone, solid surface, or integrated bowls.
3.5 Remove the Cabinet
- Locate and remove screws fixing the cabinet to the wall.
- Gently pry the unit away from the wall, watching for hidden fasteners.
- Inspect the wall and floor for water damage or mold; plan repairs if needed.
In older buildings, this is a good moment to check plumbing compliance. It’s also the time to check electrical compliance. These should be brought up to current standards.
4. Step-by-Step: Installing the New Bathroom Cabinet Vanity
Installation is where the difference between DIY and professional work really shows—especially in hotels where every millimeter matters.
4.1 Confirm Measurements and Level
Before placing the new cabinet:
- Check wall-to-wall width and depth against the new vanity dimensions.
- Mark centerline for the basin and any tall cabinet.
- Use a level (or laser level) to mark the top height and reference lines across the wall.
For bathroom vanities for small bathrooms, accurate layout prevents doors from hitting each other, and keeps circulation clear.
4.2 Position and Fix the Cabinet
- Place the cabinet in position and adjust with shims as needed.
- Ensure the cabinet is level front-to-back and side-to-side.
- Fix the cabinet to wall studs or appropriate anchors with screws, following manufacturer recommendations.
If you are installing corner vanities for bathrooms, pay special attention to wall angles. Ensure the front edges sit square and align with doors or showers. Even a small misalignment is very visible in tight spaces.
4.3 Install the Top and Basin(s)
For factory-made or custom built bathroom vanity tops:
- Dry-fit the top first to confirm clearances.
- Apply recommended adhesive or silicone to the cabinet edge.
- Place the top, align with walls and front edge, and press gently.
- Wipe off any excess sealant quickly.
For double vanity sinks for bathrooms, check local plumbing codes for trap configuration and venting. In many cases, installers use a double-outlet drain. Alternatively, they might use a properly vented branch.
4.4 Reconnect Plumbing
- Install the basin drain(s) and connect to the P-trap.
- Connect the hot and cold supply lines with new flexible hoses.
- Open the shut-off valves and check for leaks.
Projects that aim for water savings or LEED points often specify WaterSense-labeled faucets and fittings. These products meet the efficiency and performance criteria set by the U.S. EPA.
4.5 Seal and Finish
- Apply silicone or sanitary sealant along the back edge between the top and wall.
- Seal any gaps around side splashes and at the base if needed.
- Reinstall mirrors, lighting, and accessories once sealant has cured.
In a hotel or apartment, ensure every bathroom is finished with the same detailing standard. This ensures guests perceive a consistent brand experience.
5. Special Tips for Hotels and Multi-Unit Apartments
Replacing a single vanity is one thing. Replacing 200 identical vanities is a completely different project.
5.1 Standardize Sizes and Models
Choose a small family of models:
- One main size for standard rooms
- One variation for accessible rooms
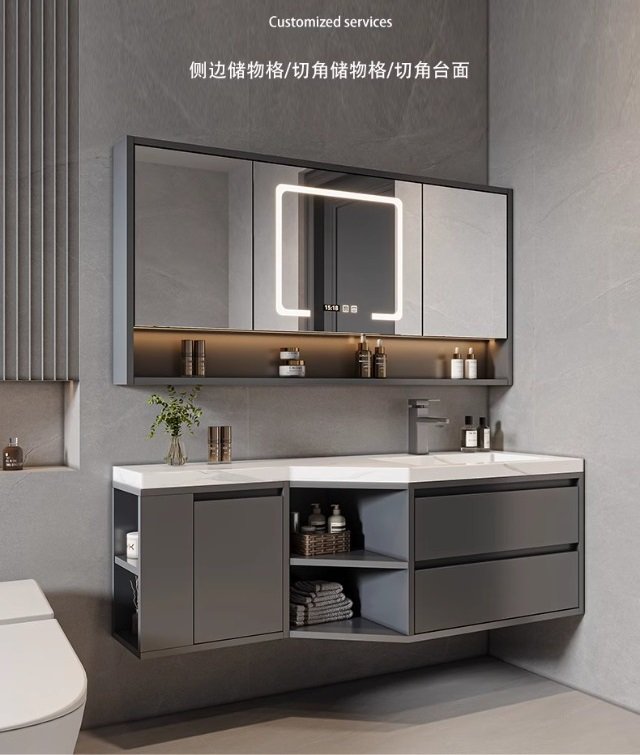
- Optional bathroom vanity with tall cabinet or shelving package for long-stay apartments
Document these SKUs clearly so future renovations or repairs use the same or compatible units.
5.2 Batch Work by Stack or Floor
To minimize disruption:
- Group bathrooms by riser or stack so plumbing and shut-offs are shared.
- Plan demolition and installation in sequences (e.g., remove 10, install 10, then move on).
This approach reduces time spent moving materials and tools around the building.
5.3 Use Pre-Engineered Project Vanities
Instead of mixing random models, use project-specific designs from a wholesale bathroom vanity supplier:
- Pre-cut for your plumbing layout
- Pre-drilled for consistent fixing points
- Packed for efficient transport and on-site handling
6. Common Mistakes to Avoid
Even experienced teams can make mistakes that cost time and money.
6.1 Poor Waterproofing and Sealant Work
In small bathrooms, a poor seal can send water into the cabinet or wall:
- Always seal along the back edge and around basins
- Avoid gaps at joints between top and cabinet
- Check that silicone is appropriate for wet areas
6.2 Weak Fixings
A vanity must withstand daily use, cleaning, and occasional abuse:
- Use correct anchors for the wall substrate (concrete, block, studs, etc.)
- Follow manufacturer torque and spacing recommendations
This is especially important for floating vanities. It is also crucial for bathroom vanities for small bathrooms. Guests might lean on the top or place heavy bags there.
6.3 Ignoring Accessibility and Code Requirements
For accessible rooms:
- Confirm required clearances, heights, and knee space under basins
- Coordinate vanity design with grab bars and clear floor space
In multi-unit projects, failing an inspection on one prototype bathroom can delay the entire renovation.
7. How to Choose Replacement Vanities for Large Projects
There is a basic question. How do you replace a bathroom vanity? Additionally, project owners need to decide what to replace it with.
7.1 Define Your Bathroom Typologies
Typical project types:
- Standard guest bathrooms
- Suites with double vanity sinks for bathrooms
- Small studios using space-saving vanities
- Corner layouts using corner vanities for bathrooms
Define each type, then assign a specific vanity model to it.
7.2 Choose Materials for Durability and Cost
For large B2B orders:
- Melamine on moisture-resistant cores for economy and midscale projects
- Plywood carcasses for high-end or high-humidity applications
- MR-MDF fronts for painted or routed designs
Combining these with water-efficient fixtures can support LEED water efficiency strategies and other green building goals.
7.3 Consider Add-Ons: Tall Cabinets and Mirror Cabinets
Many replacement projects also introduce:
- Bathroom vanity with tall cabinet modules for extra storage
- Mirror cabinets with integrated lighting and demister pads
You will sometimes see misspelled queries like “bathroom vanity with tallcabinet” or “corner vanities forbathrooms” in search logs. They reflect real market demand for these space-saving solutions, and optimizing product lines for them can bring additional project leads.
7.4 Custom Built Bathroom Vanity for Special Layouts
For irregular or premium rooms, a custom built bathroom vanity may be required:
- Special lengths or depths
- Unique finishes matching brand guidelines
- Integrated openings for trash bins, laundry, or under-counter lighting
A good bathroom cabinet vanity manufacturer can turn these into standardized modules across multiple properties.
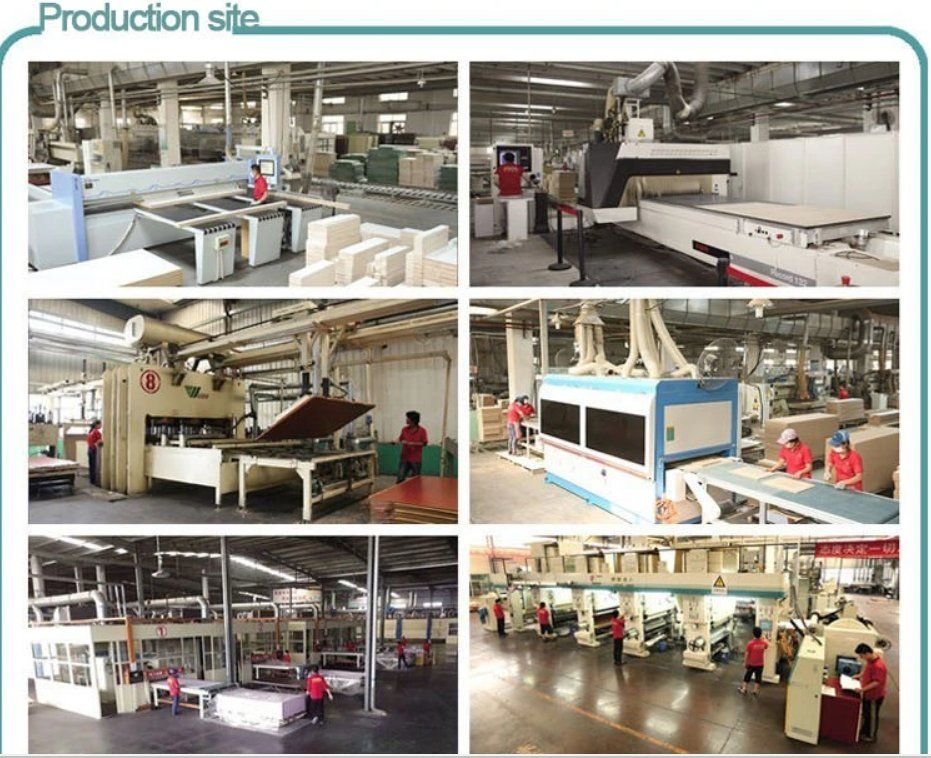
8. Why Work with a Professional Bathroom Cabinet Vanity Manufacturer
For serious hotel and apartment operators, partnering with a bathroom cabinet vanity manufacturer is a strategic decision.
8.1 OEM/ODM Capabilities
OEM/ODM cooperation offers:
- Custom branding on standard platforms
- Flexible size and layout modifications
- Shared engineering work across multiple projects
Wholesalers become true project partners instead of buying retail units. They are supported by a wholesale bathroom vanity supplier that understands construction drawings and site constraints.
8.2 Project Management and Documentation
Professional manufacturers provide:
- Technical drawings and installation manuals
- Packing lists aligned with room numbers or stacks
- Sample sets and mock-ups for client approval
This makes it far easier to implement a bathroom vanity replacement program across multiple sites or regions.
8.3 Long-Term Support and Spares
Over time, some units may be damaged. It is much easier to order matching replacements from a stable supplier. This is preferable to hunting for similar units on the retail market years later.
9. FAQ: How Do You Replace a Bathroom Vanity?
Q1. How do you replace a bathroom vanity in an operating hotel?
You plan in phases. First, block a small group of rooms. Next, shut off water to the riser. Remove old units and install new vanities. Reconnect plumbing and complete finishing work. Finally, release the rooms back to operation. Standardized vanities and pre-engineered designs speed up every step.
Q2. How long does it take to replace one vanity?
For a trained team, replacing one standard vanity can take a few hours, depending on wall repairs and plumbing changes. On a project scale, the key is not speed per bathroom but consistent daily productivity across many rooms.
Q3. Can I upgrade to double vanity sinks for bathrooms during replacement?
Yes, if your space and plumbing allow it. You may need to rework supply and drain lines and ensure there is still enough turning and circulation space. Suites and premium apartment units are usually the best candidates for double vanities.
Q4. Do I need to replace the entire vanity, or can I just change the top?
It depends on the condition of the cabinet. If the carcass is structurally sound and modern enough, replacing only the top and faucet may be sufficient. For swollen boards, outdated design, or inconsistent colors, a full replacement gives better long-term value.
Q5. How do I reduce water use when replacing vanities?
Specify WaterSense-labeled faucets and efficient fixtures, and design the bathroom to reduce unnecessary water use. This helps cut operating costs and supports LEED or other green building certifications.
Q6. Why is planning more important than the actual removal?
Removing a vanity is relatively simple. The challenge in hotel and apartment projects is coordinating access, safety, logistics, plumbing, and quality across many identical rooms. That’s why detailed planning is crucial. Collaborating with a reliable bathroom cabinet vanity manufacturer is more important than the physical task itself.
10. Recommended External Resources
- U.S. EPA – WaterSense Program
Official information on water-efficient products and the WaterSense label, including faucets and other bathroom fixtures. - U.S. Green Building Council – LEED Water Efficiency
- OSHA – Personal Protective Equipment Standards
These are the official OSHA standards for PPE. They are relevant for contractors and maintenance teams. This is especially important for those working on bathroom renovation projects.
11. About Us – Your OEM/ODM Bathroom Vanity Partner
At Starwood, we specialize in project solutions for hotels, serviced apartments, and multifamily buildings. These projects require reliable bathroom vanities for small bathrooms and standard-size layouts.
- Who we serve
- Wholesalers and distributors
- Hotel owners and operators
- Developers and general contractors
- Facility managers managing large renovation programs
- What we provide
- OEM/ODM services as a bathroom cabinet vanity manufacturer
- Project-specific designs including bathroom vanity with tall cabinet, corner vanities for bathrooms, and custom built bathroom vanity units
- Bulk production and export-ready packaging for international projects
- How we support your projects
- Technical drawings, sample sets, and mock-ups
- Size and material optimization for budget and brand standards
- Long-term supply for future replacements and extensions
If you are planning to replace bathroom vanities in a hotel or apartment project, reach out to our team. We can discuss standard models. We also offer custom options and OEM/ODM cooperation.